• Skip to primary navigation
  • Skip to main content
  • Skip to primary sidebar
  • Skip to footer
Dinner Tonight

Dinner Tonight

Healthy Cooking for a Healthy Texas

  • Email
  • Facebook
  • Instagram
  • Pinterest
  • Twitter
  • YouTube
  • Home
  • Recipes
  • Store
  • Healthy Cooking Tips
    • How To
    • Food Safety
  • Family Mealtime
  • Meet the Team
  • Events

Healthier Sandwich

June 6, 2025 by odessa.keenan

Sandwiches are a classic for both picnics and easy on-the-go lunches. But some simple tweaks can help you build a healthier sandwich!

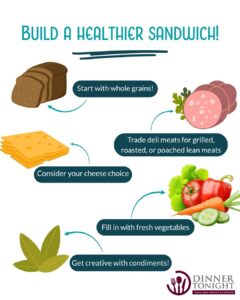
Starting with whole grain is a great first step.

USDA MyPlate Guidelines recommend that you make half your grain choices whole grain ones each day, and using whole grain sandwich bread is a fantastic way to get more fiber and other beneficial nutrients in, while giving your body sustainable energy that keeps you satisfied longer and helps stabilize your blood sugar.

Trade deli meats for other lean meat choices

Deli meats are typically high in sodium, saturated fat, and also nitrates and nitrites, which all can contribute to health concerns like high blood pressure and high cholesterol. Subbing in lean protein choices, such as roasted or grilled chicken or turkey, is a great way to add some filling protein without the drawbacks. It also gives you the chance to season it the way you prefer and customize your sandwich flavors!

Consider your cheese choice.

Cheese can be a delicious addition to your sandwich, but is another ingredient that can quickly add a larger amount of sodium and saturated fat, even in small servings (just 1 oz of cheddar cheese can contain around 5 oz of saturated fat!). Cheeses that tend to be the highest in sodium include American cheese, feta, parmesan, and blue cheese. It’s important to read labels on low-fat cheeses, because they also often have higher levels of sodium to make up for taste loss with the reduction of fat. Lower fat and sodium cheese choices include ricotta, goat cheese, Swiss cheese, cottage cheese, and fresh mozzarella. Another way to cut the sodium and saturated fat is to use cheese sparingly, more like a garnish than a main sandwich component!

Fill in with fresh vegetables.

Sandwiches are perfect vehicles for a variety of fresh veggies! Adding vegetables to your sandwich makes them more visually appealing, adds fun flavor and crunch, and greatly increases the nutrient density. Consider adding cucumbers, fresh greens, chopped or grated carrots, sliced tomatoes or avocados, red onion rings, etc. to add more interest and nutrition to your sandwich!

Get creative with condiments.

Basic sandwich condiments include mustard and mayo, but you don’t have to stop there! Drizzle some vinegar and oil, make a simple smashed fruit spread, or add fresh herbs to elevate the flavor in a healthy and fun way!

What other ways do you like to customize your sandwich for max nutrition benefit and flavor?

Sandwiches are a classic picnic main dish choice, but there are some things to consider to make them both safe AND delicious!

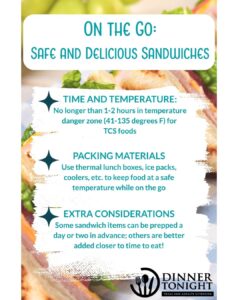
Time and Temperature.

If you’re using foods that need refrigeration (also called Time/Temperature Control for Safety or TCS foods), remember to take steps to avoid the temperature danger zone (41-135 degrees). This means making a plan to eat them quickly or  keep your cold sandwiches cold (below 41 degrees) if you plan to be out longer than 2 hours with them (or longer than 1 hour if the outside temp is over 90 degrees!).

Packing Materials.

There are lots of options for what to pack your sandwich in. The classic wicker basket is cute for picnic pictures, but doesn’t keep your food properly chilled without some help! Make sure you bring other solutions, like coolers, thermal lunch boxes with ice packs, etc. to help maintain safe temperatures. Plastic sandwich bags and reusable sandwich wraps (like beeswax ones) CAN be washed and used multiple times as long as you make sure they are properly cleaned after each use and not used for containing raw meats, fish, eggs, or other hazardous foods. If you have an especially hefty sandwich, or one with ingredients that tend to fall out, cooking twine or toothpicks can be a handy solution for holding your sandwich together!

Extra Considerations.

Many sandwiches can be prepped in advance and stored safely in the refrigerator. For best quality, it’s recommended to eat them about 3 days after you prepare them. Some sandwich components, especially saucy condiments and some fruits and vegetables with a lot of moisture are best left off until the day you plan to eat them. Pro-tip: to prevent these ingredients from making your bread too soggy, layer these on top of spread cheese, on a bed of greens, or between your meat and cheese slices to add a layer of protection!

Apple Tuna Salad Sandwich
Avocado Tuna Salad Sandwich recipe by Dinner Tonight Avocado Tuna Salad Sandwich
Egg salad sandwiches on a cutting board Easy Egg Salad
Grape and Avocado Grilled Cheese Sandwiches
Hot Alaska Salmon Melts, a recipe by Dinner Tonight Hot Alaska Salmon Melts
Mediterranean Chicken Sandwich ready to eat placed on a wooden cutting board Mediterranean Chicken Sandwich
Strawberry Balsamic Chicken Sandwich

Filed Under: Food Safety, Tips & Tricks

Bento Box

April 18, 2025 by odessa.keenan

Are you stuck in a lunch rut? Say goodbye to boring meals and hello to the vibrant world of bento boxes! These delightful, colorful creations not only spark joy but also inspire creativity in your lunchtime choices. Imagine a beautifully arranged box filled with a rainbow of fresh veggies, proteins and wholesome grains, all perfectly portioned and ready to satisfy your tastebuds. Plus, we’ve got practical tips on food safety to ensure your bento creations stay fresh and delicious, empowering you with the knowledge to make healthier choices. with bento boxes, meal planning becomes a breeze, simplifying your lunchtime routine while enhancing your wellness journey. So, gather your family, unleash your imagination and embrace the bento box adventure together. Because healthy eating can be fun, exciting, and a wonderful way to bond over delicious food!

What is a Bento Box?

A bento box is a compact, all-in-one Japanese-style lunch box that contains single portions of foods to create a balanced meal. A traditional bento box will usually include a portion of a starch, such as rice, a protein, and either fruits or vegetables for sides. Bento boxes have been around for many, many years and were usually used for traveling soldiers to carry a quick, easy-to-eat meal.

Nowadays, a modern bento box comes in many shapes and sizes to provide us with a quick, creative breakfast, lunch or snack option. We can now find bento boxes with utensils, ice packs for easy meal prep, and multiple compartments.

Making a Tasty Bento Box

Cool Your Food – Make sure food is cooled at room temperature before packing to avoid condensation and bacteria. If you are using ingredients like yogurt or cheeses, make sure to include an ice pack while you get to store your bento box at work or school.

Add Textures and Color – Through meal prep, you can consider using multiple textures and colors for your bento box to make your eating experience much more fun and enjoyable. This tip will also allow you to include more fruit and vegetable colors, adding variety to your meals.

Meal Prep Your Bento – A great way to add more benefits to your bento box is to plan your menu ahead of time. This will allow you to pack a healthy, well-balanced meal and give you more flexibility when it comes to packing your lunch. Start with simple dishes, but don’t be afraid to get creative with fun ways to prepare and pack your meals!

Bento Box Food Safety

Remember to always pack your food safely to avoid food poisoning or cross contamination. When packing up a bento box, keep in mind what needs to be stored at a certain temperature to avoid steam from being trapped in your bento box and creating bacteria growth. Always keep ice packs handy and make sure to reheat your food when you are ready to eat.

Use bento box dividers appropriately. Separate your meal portions into the appropriate sections to avoid foods mixing when they shouldn’t. This can help keep your food fresh and textures intact for when it is time to eat, like separating dressing from a salad. At the same time, mix portions that go well together to save space and allow flavors to mix, like fruit and yogurt.

Bento Box Ideas

Protein Packed – Adding protein to your bento box meals will not only make you feel full and reduces cravings but also gives you creative ways to add plant and animal protein such as adding eggs, hummus, almonds, or beans to your meals for muscle mass and bone health.

Wholesome Grains – For added fiber to improve gut health and healthy brain development, whole grains are an excellent way to feel full and eat great tasting foods. Adding brown rice, whole grain pancakes, or trying something new like quinoa will help lead a healthy diet.

Fruits & Vegetables – Including a colorful variety of fruits and vegetables to your meals will not only increase your fiber and vitamin intake but will also give you multiple textures to work with. Paring them with grains, protein, and dairy make for an easy, balanced meal.

Dairy Delights – When packing a bento box with dairy portions, make sure to include low-fat or non-fat options like Greek yogurt or low-fat cheeses with fresh flavors like fruit. Including dairy in your meals will provide an excellent source of calcium and Vitamin D.

Filed Under: Food Safety, Tips & Tricks Tagged With: Food Safety, lunch, school lunch food safety, tips, tips and tricks

Sushi Safety

February 3, 2023 by Dinner Tonight

You can make some healthier substitutions for some of the most common ingredients used to build sushi rolls. Take a look at some suggestions to make the best pick when choosing a roll.

  1. Minimize your chances of infections caused by bacteria- choose cooked fish and shellfish. Follow proper food safety practices.
  2. Add healthy protein and fiber to your sushi by incorporating edamame on the side!
  3. Choose rolls with more fruit and vegetables for added vitamins and flavor without the higher-calorie ingredients such as cream cheese and sauces.
  4. Be good to your heart, use “lower sodium” soy sauce when dipping your sushi. Easy on the dipping!
  5. Think about using whole-grain brown rice for added fiber instead of white rice.
  6. Ginger is great for cleaning your pallet with new flavors and provides some minerals such as potassium, magnesium, copper, and manganese.

See these recommendations in reality in this Spicy Salmon Sushi Cups recipe!

Source:

Healthline.com

Filed Under: Food Safety, Tips & Tricks Tagged With: Food Safety, sushi

Homemade Broth

November 11, 2021 by Dinner Tonight

Are broth and stock the same thing? Although the terms are often used interchangeably, there is a difference between the two liquids. Both are used to make recipes such as soups, sauces, and gravies. The key difference between broth and stock is the use of meat or bones, the type of seasonings added, and the cooking time.

Making your own chicken broth is a great strategy to reduce food waste, stretch your food dollars, and control the amount of sodium.

How to Slow Cook Homemade Chicken Broth

Learning to make your own chicken broth is a great strategy to reduce food waste and stretch your food dollars! Due to its versatility as a base for soups, gravies, and sauces; broth is a pantry staple for many homes. Broth can also be used as a substitution for water in recipes such as rice, pasta, and risotto as a cost-efficient way to increase flavor in the dish. Additionally, making your own broth is an excellent way to control the amount of sodium that is often found in store-bought options.

Homemade broth is simple and only requires the following ingredients:

  • One whole chicken, skin and fat removed
  • 1- 2 Cups of Vegetable Scraps, Chopped
  • Choice of herbs and seasonings
  • Water

Directions:

  1. Select a slow cooker large enough to fit the chicken
  2. Place chicken in slow cooker
  3. Add vegetables
  4. Add 1 -2 Tablespoons of your choice of herbs and seasonings
  5. Add water until the slow cookers is two-thirds full
  6. Cook on low for 6 to 8 hours or on high for 4 to 6 hours. The chicken is done when the internal temperature of the chicken is 165° F as measured with a food thermometer.
  7. Separate the chicken from the broth by lifting the chicken and bones onto a large plate or bowl. Let chicken cool enough to touch in the refrigerator. Shred the meat with a fork and store in airtight containers. This chicken can be used in salads, sandwiches, or other recipes.
  8. Strain the broth by pouring into a colander over a large bowl. Dispose of the vegetables.
  9. Divide the broth into 1 cup containers, cover tightly, and refrigerate overnight.
  10. The next day, scoop off and dispose of fat that has settled on top of broth.
  11. Label the containers of broth with the date. Store in the refrigerator for up to 4 days or in the freezer for up to 4 months.

Looking for ways to reduce food waste at home? Save leftover scraps from vegetables to flavor your homemade broth or stock. Roughly chop leftover or lackluster vegetables into small chunks and store in the freezer in an airtight container. Continue to add scraps to the bag until it is full or you are ready to make your homemade stock or broth!

References:

https://cfaes.osu.edu/news/articles/chow-line-the-difference-between-broth-and-stock

https://spendsmart.extension.iastate.edu/recipe/chicken-broth/


Filed Under: Food Safety, How to videos, Tips & Tricks Tagged With: both, Chicken, How To, Slow Cooker, soup, stock

Casserole

November 10, 2021 by Dinner Tonight

Here is your one-stop casserole shop for all things casserole knowledge!

Busy weeknights call for simple mealtime recipes. Use this quick formula to help you with your casserole mashup!

  • 2 cups veggies,
    • get creative with it!
  • 1-2 cups starch
    • such as potatoes, bread, or pasta
  • 1 cup binder
    • such as milk, soup, or cheese
  • 1 cup protein
    • such as eggs, chicken, beef, and much more!
  • Seasonings
    • be sure to keep an eye on the sodium levels you’re adding!

Family mealtime can be busy, but you don’t want to forget about food safety. According to USDA guidelines, the internal temperature of casseroles should reach 165 degrees Fahrenheit before you can serve them for safe consumption.

Check out some of our casserole recipes on our website to get you started! Our Poblano Casserole recipe is one you may not have tried yet but is sure to be a new family favorite!

Filed Under: Food Safety, How to videos, Tips & Tricks Tagged With: casserole, Food Safety, How To

  • Page 1
  • Page 2
  • Page 3
  • Interim pages omitted …
  • Page 15
  • Go to Next Page »

Newest Recipes

  • Chicken Taco Wraps with Spicy Sauce
  • Southwest Beef Skillet
  • Balsamic Chicken and Spinach Salad
  • Blackberry Mocktail
  • Chicken, Mushroom and Caramelized Onion Flatbread

Recipes to Try

  • Main Dishes
    • Beef Recipes
    • Chicken Recipes
    • Turkey Recipes
    • Pork Recipes
    • Seafood Recipes
    • Vegetarian Recipes
    • Salad Recipes
  • Side Dish Recipes
  • Snack Recipes
  • Dessert Recipes
  • Kid Friendly Recipes
  • All Recipes

Sign up for our newsletter to get new recipes & tips!

Sign Up Now

AgriLife Extension logo

  • Compact with Texans
  • Privacy and Security
  • Accessibility Policy
  • State Link Policy
  • Statewide Search
  • Veterans Benefits
  • Military Families
  • Risk, Fraud & Misconduct Hotline
  • Texas Homeland Security
  • Texas Veterans Portal
  • Equal Opportunity
  • Open Records/Public Information
Texas A&M University System Member